Introduction
Whether you’re applying for a visa, purchasing a commuter pass, submitting official documents, applying for a job, or creating a student ID card, there are many situations in Japan where you’ll need an official ID photo.
Fortunately, getting one is quick and convenient. Throughout Japan, you’ll find thousands of automated photo booths that allow anyone to take professional-quality identification photos in just a few minutes. These machines are located outside train stations, inside shopping malls, near government offices, at electronics stores, and even outside convenience stores, making them easy to access wherever you’re traveling.
Unlike traditional photo studios, Japanese photo booths are completely self-service. Simply step inside the booth, follow the on-screen instructions, sit down, and let the machine guide you through the process. Within minutes, you’ll receive professionally printed ID photos that meet many official Japanese photo requirements.
For people staying in Japan for an extended period, these booths can be especially useful. You may need ID photos when applying for residence-related procedures, opening certain accounts, joining schools, obtaining memberships, or completing various administrative applications. Even short-term visitors sometimes need passport-style photos for permits or special documents.
Many of Japan’s latest photo booths also include advanced features such as multilingual instructions, automatic face positioning, background adjustment, skin-tone correction, and digital data downloads. These modern functions make the experience simple, even for first-time users who don’t speak Japanese.
Another advantage is speed. While visiting a photography studio may require an appointment and take considerable time, most photo booths allow customers to complete the entire process in less than ten minutes. This makes them an ideal solution for busy travelers who need official photographs quickly.
Because photo booths are available across the country, you rarely have to search very far. Whether you’re exploring Tokyo, Osaka, Kyoto, Fukuoka, Sapporo, or smaller regional cities, you’re likely to find a booth within walking distance of a major train station or shopping center.
In this guide, you’ll learn everything you need to know about using Japanese photo booths, including where to find them, how much they cost, how to take better photos, and what to expect during the process.
In this article, you will learn:
- Where to find photo booths in Japan
- How Japanese photo booths work
- Step-by-step instructions
- Typical prices and payment methods
- Tips for taking better ID photos
- Common mistakes to avoid
What Are Japanese Photo Booths?
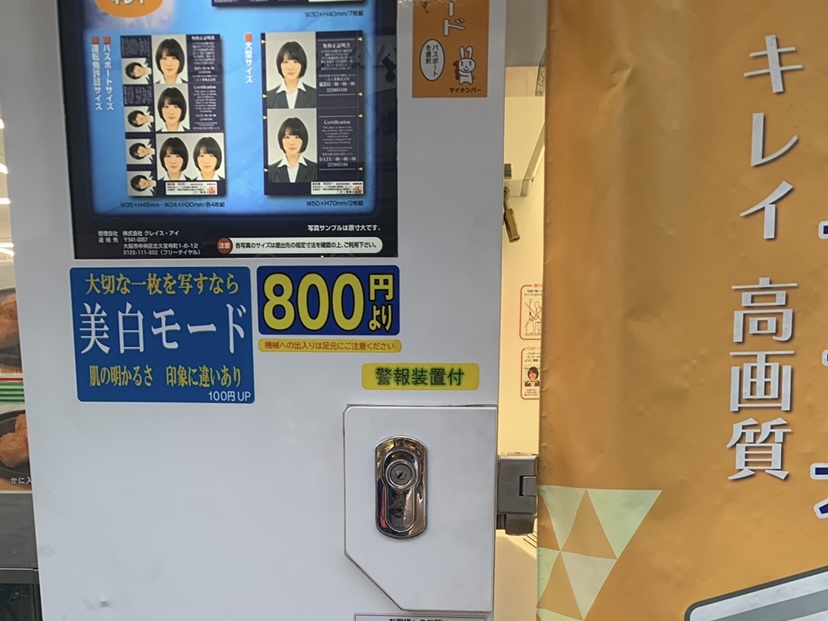
Japanese photo booths are automated machines designed to produce official identification photographs that meet government, school, company, and transportation requirements.
Unlike the colorful photo sticker booths (purikura) that are popular among teenagers, these machines are specifically designed for professional ID photos. They produce clear, high-quality images with plain backgrounds and standardized photo sizes suitable for passports, visas, driver’s licenses, resumes, and many other official applications.
Most booths are enclosed for privacy, allowing customers to take photographs without feeling rushed or embarrassed. Inside, you’ll find a comfortable seat, adjustable camera, lighting system, touchscreen display, and payment terminal.
Many newer models also support several languages, making them much easier for international visitors to use.
The machines automatically guide users through each step, including selecting the photo size, adjusting seating position, checking head alignment, and taking the photograph.
Some advanced booths even provide features such as:
- Automatic face positioning
- Skin smoothing
- Brightness adjustment
- Background correction
- Digital image download
- Multiple print sizes
- Resume photo optimization
These features help customers produce professional-looking ID photos without visiting a photography studio.
Where Can You Find Photo Booths?
One of the biggest advantages of Japan’s photo booths is how easy they are to find.
They’re commonly located in busy public places where people frequently need official photographs.
Popular locations include:
- Major train stations
- Shopping malls
- Electronics stores
- Government offices
- Driver’s license centers
- Universities
- Business districts
- Large supermarkets
- Some convenience store parking areas
Because train stations are among the most common locations, many visitors simply encounter a booth while walking to their destination.
Large stations in Tokyo, Osaka, Kyoto, Yokohama, Nagoya, and Fukuoka often have several booths located near ticket gates or station exits.
Electronics retailers such as large appliance stores also frequently install photo booths near their entrances.
Government buildings often provide booths as well, allowing people to take official photos immediately before submitting applications.
Many online maps also list nearby photo booths, making them easy to locate if you need one quickly.
When Might Someone Need ID Photos?
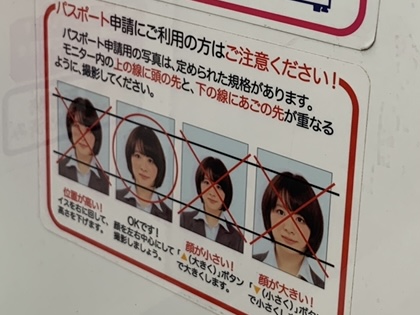
Many travelers don’t expect to need ID photos during their trip, but there are actually several situations where having passport-style photographs can be helpful.
Long-term visitors, international students, and people working in Japan often need ID photos when completing official procedures.
Common examples include:
- Residence-related applications
- Student registrations
- Employee identification cards
- Company paperwork
- Membership cards
- Transportation passes
- Visa-related documents
- Various government applications
Even tourists occasionally need official photographs for special permits or replacement travel documents.
Because photo booths are inexpensive and widely available, they provide a fast solution whenever official photographs are unexpectedly required.
How to Use a Japanese Photo Booth
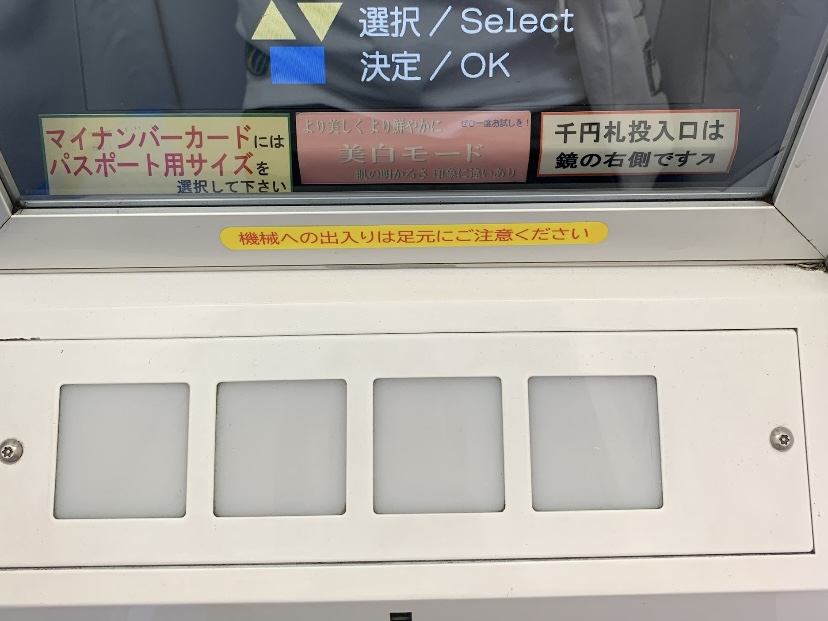
Using a Japanese photo booth is much easier than many first-time visitors expect. Although the interface may look complicated at first, most machines provide clear on-screen guidance and automatically lead you through each step.
The entire process usually takes between five and ten minutes, making it much faster than visiting a professional photography studio.
If you’ve never used one before, simply follow the instructions below.
Step 1: Choose Your Photo Size
After entering the booth, the first screen will ask you to choose the type of photograph you need.
Depending on the machine, you may see options for:
- Passport photos
- Visa photos
- Resume (CV) photos
- Driver’s license photos
- Student ID photos
- Custom sizes
- Digital-only photos
Many booths display sample sizes on the screen, making it easy to choose the correct option.
If you’re unsure which size you need, check the requirements of the organization requesting the photo before making your selection.
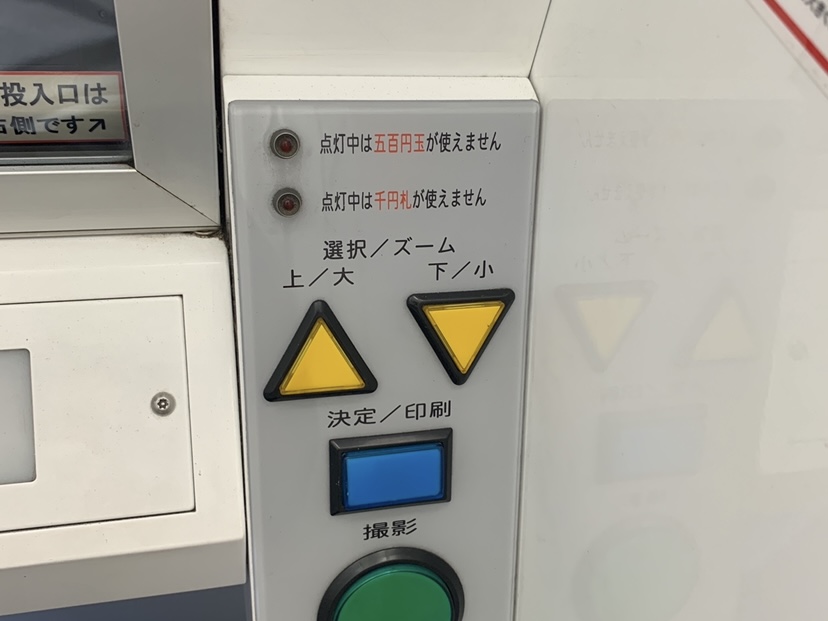
Step 2: Pay for Your Photos
After selecting your preferred photo type, you’ll be asked to complete payment.
Many newer machines accept several payment methods, including:
- Cash
- IC cards (Suica, PASMO, ICOCA, etc.)
- Credit cards
- QR code payments
- Digital payment
Some older booths only accept cash, so carrying a small amount of Japanese yen is always a good idea.
Once payment is complete, the machine automatically continues to the photography screen.
Step 3: Adjust Your Position
The booth will instruct you to sit on the chair and look directly toward the camera.
Many modern machines automatically display guide lines showing where your face should be positioned.
Try to:
- Sit up straight.
- Look directly at the camera.
- Keep your shoulders level.
- Remove hats and sunglasses.
- Make sure your hair does not cover your eyes.
- Maintain a natural facial expression.
Some booths automatically adjust the camera height, while others allow you to move the seat until your face fits inside the guide frame.
Take a few seconds to position yourself carefully because this will greatly improve the final result.
Step 4: Take the Photo
Once you’re properly positioned, the booth begins a short countdown.
“3…
2…
1…
Smile!”
Try to remain completely still during the countdown.
Blinking or moving at the last second may cause the photo to become blurry.
Many machines take several photos in quick succession and automatically choose the best image.
Some booths even allow you to review multiple photos before making your final selection.
Prices and Payment Methods
One reason Japanese photo booths are so popular is their affordable price.
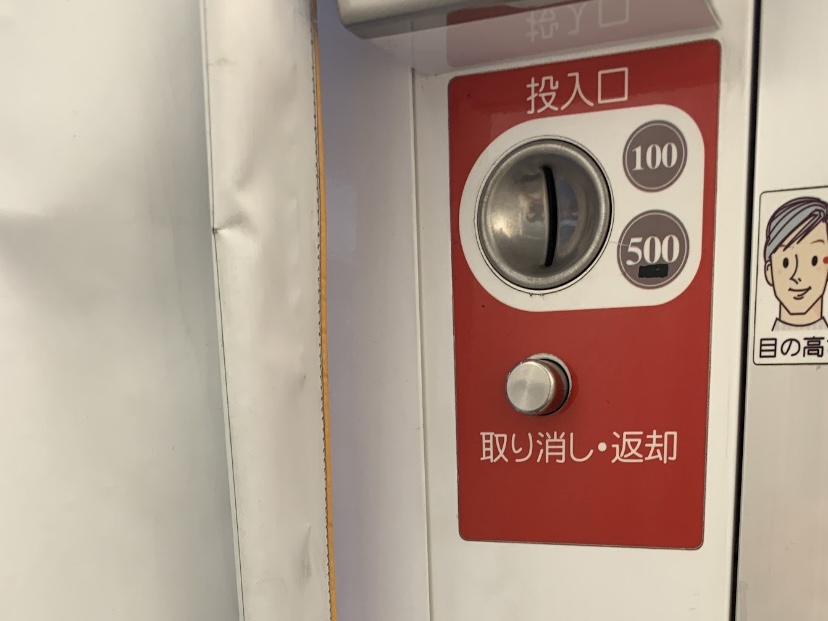
Although prices vary depending on the manufacturer and the features offered, most standard ID photo sessions cost between ¥800 and ¥1,200.
Premium booths with beauty filters, higher-resolution cameras, or digital download services may charge between ¥1,500 and ¥2,000.
Compared with professional photography studios, these prices are very reasonable while still providing high-quality photographs suitable for official applications.
The exact price usually depends on:
- Number of printed photos
- Photo size
- Digital download option
- Beauty correction features
- Background adjustment
- Image quality
Many travelers choose booths that include both printed photographs and digital image files, allowing them to use the same picture for online applications later.
Payment methods have also become much more convenient in recent years.
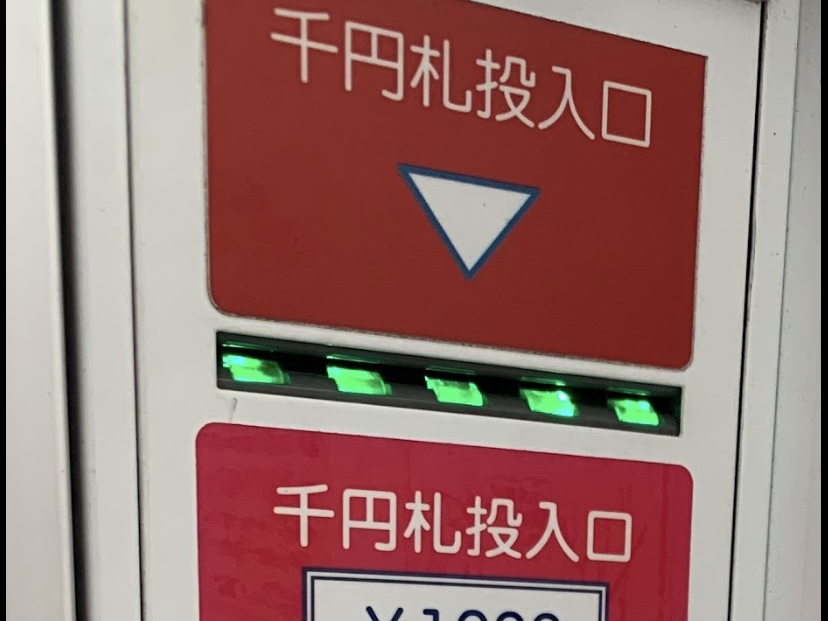
Many newer booths support:
- Cash
- Credit cards
- IC transportation cards
- QR code payments
- Smartphone payments
However, because some older machines remain cash-only, it’s always wise to carry some Japanese yen just in case.
Digital Photo Downloads
One of the biggest improvements in modern Japanese photo booths is the ability to receive digital copies of your photographs.
Instead of only printing physical photos, many machines now generate a QR code that allows you to download the image directly to your smartphone.
This feature is especially useful for people applying online for jobs, visas, schools, memberships, or government services.
Having a digital version also means you can print additional copies later without taking another photo.
Some booths even store your image temporarily in the cloud, allowing you to download it from another device after leaving the booth.
Because online applications are becoming increasingly common, many customers now choose booths that include both printed and digital versions of their ID photos.
Tips for Taking Better ID Photos
Although Japanese photo booths make the process very simple, following a few basic tips can greatly improve the quality of your ID photo. Since these photos are often used for official documents, job applications, student IDs, and passports, it’s worth taking a few extra moments to prepare yourself properly.
Before entering the booth, take a quick look in a mirror if one is available. Check that your hair is neat, your collar is straight, and there are no wrinkles or stains on your clothing. Small adjustments can make a significant difference in the final photograph.
Choose clothing that contrasts with the background. Because most Japanese photo booths use a white, light blue, or gray background, wearing a solid-colored shirt or jacket usually produces the best results. Dark colors such as navy, black, or dark gray often create a clean and professional appearance.
Your facial expression is equally important. Most official documents require a neutral or natural expression rather than a broad smile. Relax your face, keep your mouth gently closed, and look directly into the camera. Avoid tilting your head or looking away from the lens.
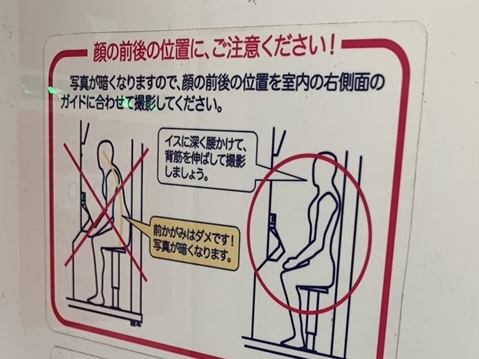
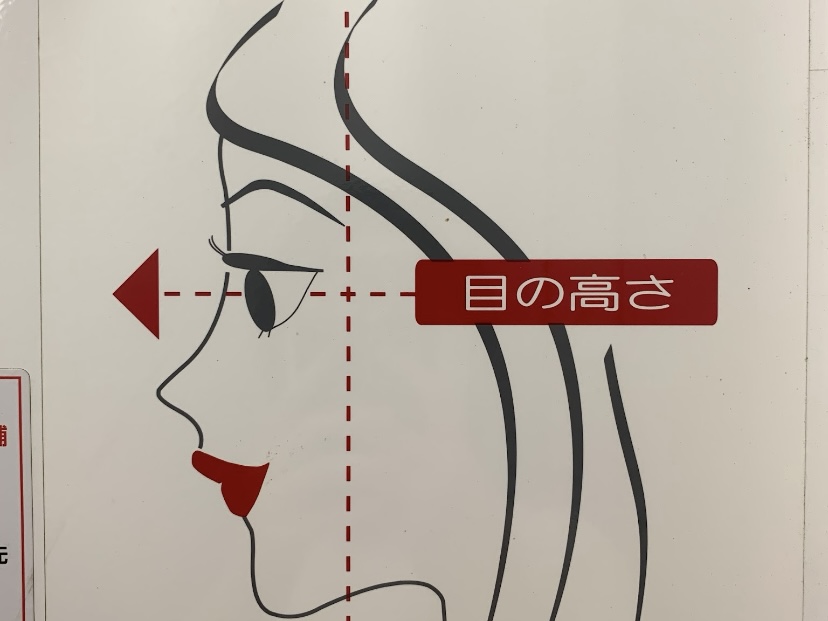
Good posture also improves the final image. Sit up straight, relax your shoulders, and keep your chin level with the floor. Looking too far up or down may cause the photo to appear unnatural or fail to meet official requirements.
If you wear glasses every day, check the requirements for the document you’re applying for. Some applications allow glasses, while others recommend removing them to avoid reflections on the lenses. If you choose to wear glasses, make sure they are clean and do not hide your eyes.
Many modern booths also include optional beauty adjustment features. These functions can slightly improve skin tone, brightness, or lighting while still producing an appropriate identification photo. However, avoid using excessive retouching if the photo will be submitted for official documents.
Common Mistakes to Avoid
Even though photo booths are designed to be user-friendly, first-time users sometimes make simple mistakes that affect the final result.
One of the most common mistakes is sitting in the wrong position. If your face is too high, too low, or too close to the camera, important parts of your head or shoulders may be cropped. Always follow the positioning guide displayed on the screen before taking the picture.
Another mistake is blinking during the countdown. Most booths count down from three before taking the photo, so try to keep your eyes open and remain completely still until the picture has been captured.
Some people also forget to remove hats, headphones, or sunglasses. For most official identification photos, these items are not permitted unless required for medical or religious reasons.
Hair covering your eyes or face can also create problems. If your bangs are long, gently move them aside so both eyes are clearly visible. Similarly, avoid hairstyles that cast heavy shadows across your face.
Another mistake is choosing the wrong photo size. Passport photos, visa applications, resumes, and driver’s licenses may all require different dimensions. Before selecting a size on the machine, check the official requirements to avoid having to take another set of photos.
Finally, don’t rush. Although the entire process only takes a few minutes, spending an extra moment adjusting your posture and appearance usually leads to much better results.
Summary
Japanese photo booths offer one of the fastest, easiest, and most affordable ways to take professional-quality ID photos. Conveniently located in train stations, shopping malls, electronics stores, government buildings, and other public places throughout the country, these self-service machines make it possible to obtain official photographs in just a few minutes. Whether you’re a tourist, an international student, a business traveler, or someone living in Japan, knowing how to use a photo booth can save both time and money whenever identification photos are required.
Throughout this guide, we’ve explored how Japanese photo booths work, where to find them, how much they cost, and the simple steps needed to take high-quality photographs. We’ve also looked at useful features such as digital image downloads, cashless payment options, multilingual support, and automatic face positioning, all of which make the process easier than ever before. Even if you have never used a photo booth in Japan, following these simple instructions will help you complete the process with confidence.
One of the greatest advantages of Japanese photo booths is their convenience. Unlike traditional photography studios, there is usually no need to make an appointment or wait for your photographs to be developed. Most machines can produce professional-quality prints in less than ten minutes, allowing you to continue your sightseeing or daily activities without interruption. This speed is especially helpful when official documents need to be submitted on short notice.
Modern photo booths also provide excellent image quality. High-resolution cameras, carefully designed lighting, automatic positioning guides, and optional beauty correction features help produce clear, natural-looking photographs suitable for passports, visas, resumes, driver’s licenses, student IDs, and many other official applications. Many machines even allow customers to receive digital copies through QR codes, making it easy to use the same image for online applications or future printing.
Preparing before taking your photo is equally important. Wearing appropriate clothing, checking your hairstyle, maintaining good posture, looking directly into the camera, and selecting the correct photo size can all improve the final result. Taking an extra minute to adjust your appearance often leads to a much more professional photograph, reducing the need to retake the pictures later.
Another reason these machines are so popular is their accessibility. Whether you’re visiting Tokyo, Osaka, Kyoto, Fukuoka, Sapporo, Nagoya, Hiroshima, or smaller regional cities, you’ll usually find a photo booth near major train stations, shopping centers, or government offices. Because they are so widely available, travelers rarely need to spend much time searching for one when official photographs are unexpectedly required.
Japanese photo booths also reflect the country’s commitment to efficiency and customer convenience. They combine advanced technology with simple operation, allowing almost anyone to complete the process successfully without specialized knowledge. Even visitors who do not speak Japanese can often use the machines thanks to multilingual menus and intuitive touch-screen instructions.
If you’re planning to stay in Japan for work, study, or an extended vacation, learning how to use a photo booth is a practical skill that may prove useful more than once. From applying for residence-related documents to preparing job applications or creating membership cards, high-quality ID photos are required in many situations. Knowing exactly where to find a booth and how to operate it can make these procedures much less stressful.
Ultimately, Japanese photo booths are much more than simple vending machines for photographs. They are an excellent example of how Japan combines convenience, technology, and efficiency to make everyday tasks quick and accessible. By understanding how they work and following the tips in this guide, you’ll be able to take professional-looking identification photos with confidence whenever you need them.
Whether this is your first trip to Japan or you’re already familiar with the country’s unique services, using a Japanese photo booth is a simple experience that demonstrates why Japan is famous for its practical innovations and outstanding customer convenience. With just a few minutes, a small fee, and a little preparation, you’ll walk away with high-quality ID photos ready for almost any official purpose.